The Ultimate Guide to All Bike Old Wiring Connection Ideas: Step-by-Step Restoration and Rewiring
Indruction
Ever stared at a tangle of cracked wires on your vintage motorcycle and felt lost? Those old bike wiring connections can turn a simple ride into a headache. Brittle insulation flakes off with a touch, mystery splices hide faults, and safety worries keep you up at night. But you don't have to live with flickering lights or dead starts. This guide gives you a clear path to fix it all. We'll cover step-by-step ideas to assess, replace, and protect your old bike wiring. Think of it as breathing new life into your classic ride.
Old bike wiring means setups from before electronic ignitions took over. Most run on negative ground systems with cloth or rubber insulation that ages fast. We're talking bikes from the '60s, '70s, and earlier—Harleys, Triumphs, or Hondas. These principles work across models. You get tools to spot issues and swap wires safely. No more guessing games. Let's dive in and get your circuits humming again.
Section 1: Assessing and Diagnosing the Existing Old Wiring Harness
Start here before you touch a wire. A good look saves time and cash. You want to know what's broken without making it worse.
Identifying Common Failure Points in Vintage Systems
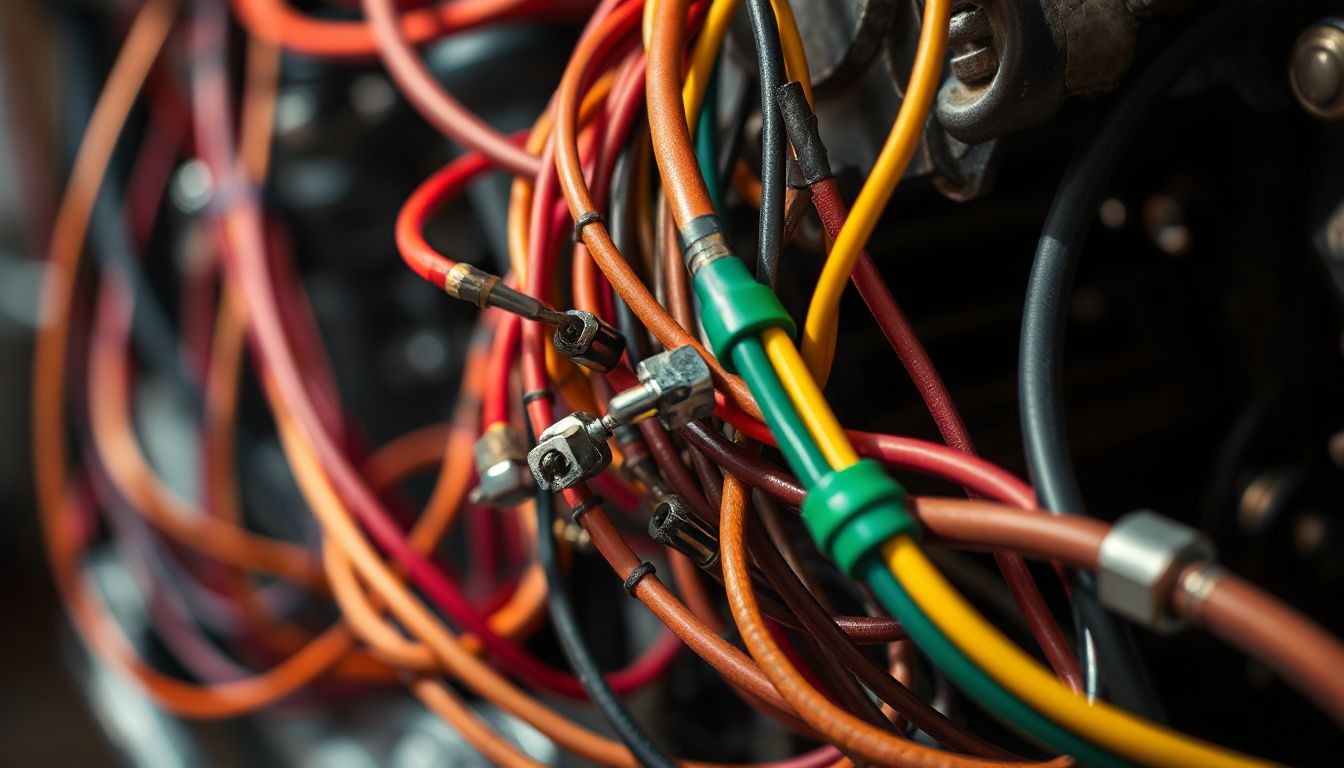
Old wires fail in spots that see the most stress. Heat from the engine cracks insulation near the exhaust. Age makes rubber brittle, so it splits on handlebars. Corrosion eats terminals, especially grounds under the tank. Fuses blow from bad splices with thin wire.
Look for faded colors or melted spots. Check frame mounts for loose fits. Past repairs often use tape that hides shorts. One rider found a hidden melt from a bad battery tie-down. It caused random stalls.
Use this quick checklist:
- Insulation: Cracks or powder when you poke it?
- Terminals: Green rust or white powder?
- Splices: Bulky tape or mismatched wires?
- Harness: Rub marks from chains or brakes?
Spot these early. It points you to the fix.
Essential Tools for Electrical Diagnosis
You need gear that works on tight bike spaces. A multimeter tops the list. Pick one with auto-range for voltage, ohms, and continuity. It beeps on good paths.
Grab a test light for quick checks. Wire strippers cut clean without nicking copper. Crimpers make solid joins. A soldering iron with fine tip helps repairs. Add insulated pliers and a small flashlight.
Picture this: Your headlight dims. The multimeter shows zero continuity at the neck. You trace a break inside the sheath. Fixed in minutes. Tools like these cut guesswork. Spend a bit upfront. It pays off in rides.
Understanding Old Wiring Schematics and Color Codes
Grab your bike's service manual first. It has the factory diagram. Without it, you're blind. Colors tell the story. Red often means power. Black is ground. But eras differ.
British bikes like BSA use Lucas codes. Brown for ignition. Green for lights. American Harleys stick to basics. Modern wires glow bright. Old ones fade to gray. Note differences.
Trace from battery to bulb. Label as you go. A mismatched code fried a friend's rectifier once. Study the map. It guides your old bike wiring connection ideas. Match it right, and sparks fly true.
Section 2: Core Principles of Safe and Effective Wire Replacement
Now you know the mess. Time to swap it out right. Focus on basics that last. Vibration and weather test every join.
Selecting the Correct Wire Gauge and Insulation Type
Gauge matters for power flow. Too thin, and it heats up. Check amp draw. Headlights need 14-16 AWG. Ignition takes 18-20 AWG. Match or go thicker.
Old cloth rots fast. Switch to GXL or TXL. They resist oil and gas. Flexible too. No more stiff harnesses.
Here's a simple match-up:
- High power (charging): 12-14 AWG
- Lights and horn: 16 AWG
- Signals and switches: 18-20 AWG
One restorer upgraded a '72 CB350. New wire stopped voltage drops. Your bike deserves that reliability.
Mastering Connection Techniques: Crimp vs. Solder
Crimp for speed on bikes. Use sealed butts or bullets. They handle shakes. Squeeze firm with ratchet crimps. No loose ends.
Solder shines for key spots. Heat the wire, add flux, flow tin. Cover with shrink tube. It seals out water. Avoid cold joints—they fail fast.
Restorers say crimp where wires move. Solder fixed points. A pro tip: Twist strands tight first. Test pull strength. Solid joins mean no fires.
Establishing Superior Ground Connections
Grounds cause most woes. Clean to metal shine with sandpaper. Scuff the frame spot. Bolt ring terminals direct.
Use star washers for bite. Tighten snug. Run a fat ground wire from battery to frame. Check with multimeter—under 0.5 ohms is good.
Bad grounds dim lights or kill starts. A clean one fixed a '65 Triumph's quirks. Ground first. It powers everything.
Section 3: Step-by-Step Rewiring of Major Sub-Systems
Break it into parts. Tackle one at a time. Label old wires. Snap photos. This keeps you on track.
Ignition and Charging System Wiring (Alternator/Generator Circuits)
Start with power sources. Disconnect battery. Remove old harness clips.
- Trace stator wires. Cut bad sections. Strip ends clean.
- Crimp new 14 AWG to connectors. Route away from heat.
- Swap regulator feed. Solder the main line. Add inline fuse.
- Ground the case. Test output at 13-14 volts.
Upgrades add diodes for surges. A full rewire on a '78 XS650 boosted charging. No more weak batteries.
Lighting Circuits (Headlight, Taillight, Indicators)
Lights draw steady current. Isolate the bundle under the tank.
- Pull wires from headlight bucket. Note colors.
- Replace with 16 AWG. Crimp bullets for easy swaps.
- Secure runs with ties. Keep from exhaust glow.
- Hook indicators. Match polarity. Flashers need load resistors for old units.
Polarity flips kill LEDs. One fix lit up a dark '70 Bonneville trail. Bright paths ahead.
Control Wiring (Switches, Horn, Solenoid)
Handlebar clusters tangle fast. Open housings gently.
- Label each wire. Number them.
- Cut and strip switches. Use 18 AWG for controls.
- Solder or crimp internals. Add strain relief loops.
- Reassemble. Test horn blast and solenoid click.
Breaks inside housings fool you. Labeling saved a '55 Panhead from hours of pain. Smooth controls now.
Section 4: Harness Management and Protection for Longevity
Wires in place? Bundle smart. Protection beats repairs.
Routing Wires for Optimal Protection and Aesthetics
Follow factory paths. Leave slack at the steering neck. Tight elsewhere.
Zip ties mimic OEM. Avoid exhaust singe zones. Pad sharp frame edges with tape.
A clean route looks pro. It cuts rubs too. Your bike thanks you with fewer fixes.
Utilizing Modern Sleeving and Looming Techniques
Loom bundles neat. Split plastic guards abrasion. Slide over groups.
Woven sleeves flex better. Wrap with tape for color pop. Techflex breathes.
One rider loomed a '84 Virago. It shrugged off trail bumps. Tough and tidy.
Final Continuity Testing and Load Verification
Power up slow. Check for grounds first. Multimeter scans shorts.
Run engine. Measure drops. Headlight should glow full at revs.
Cycle switches. All functions? You're set. A full test caught a loose crimp on my build. Ride safe.
Conclusion: The Confidence of a Clean Circuit
You now hold the keys to tame old bike wiring connections. Methodical steps mean reliable starts and bright lights. Fire risks drop. Troubleshooting eases up. High-quality parts fit the rough road life.
Key takeaways:
Grab your tools and start. Your classic deserves fresh circuits. Share your wins in the comments—what's your next project?
Friends, if you find this information useful, don't forget to share it with your friends.


Comments
Post a Comment